Stops and targets
Stops and Targets
Introduction
The attitudes and opinions presented here are those of the author and are subjective.
It's important that we have pre-defined stops and targets before we enter a trade. Stops and targets are subject to the risk profile of the trader. As such the size of your stop and the placement of targets may vary from trader to trader. DeltaT and T1 offer high probability directional plays in the market. The following use of stops and targets is what matches my risk profile and may be different for yours so you may feel more comfortable using different stops and targets. Where possible I will outline variations.
Stops
It is essential that stops are used. There is no exception to this. If a trade is not working then get out of it. If the same trade sets up again a few or several minutes later you can always re-enter. It is my attitude that you can better assess the market potential for a trade if you don't have a position. Being in a position influences what signals and potential you see in the market. Being flat allows you to objectively assess the potential direction in the market. This is the natural human psychology of not wanting to be wrong. All of us suffer from it and only with years of experience and training can you objectively assess the market potential while in a position. (I recommend Mark Douglas' book The Disciplined Trader if you want to read more on this subject.)
Stops can be hard or soft - this is my definition and I haven't seen stops defined like this elsewhere so you may find that other people don't understand you when you refer to hard and soft stops. A hard stop is a stop that is placed in the market. It will be executed if that price is touched and needs no further intervention from you once it has been placed. A soft stop is a price which you've identified as your stop price but requires you to execute the trade (hit the button) when that price is touched.
When do you use hard and soft stops? I will rephrase this question: When do I use hard and soft stops? (When you use them is up to you and your risk profile.)
I use a soft stop as soon as I've entered a trade. My soft stop is the absolute maximum loss that I'm prepared to take on this trade and is not adversely moveable. In other words, if that price is touched, I hit the button and close the trade using a market order. I use a soft stop at the beginning of a position because it allows me to take a smaller loss more quickly if I see the potential for profit in a setup disappear. I use a hard stop once I've trailed the trailing stop to breakeven or I have to go to the bathroom.
In action with DeltaT and T1
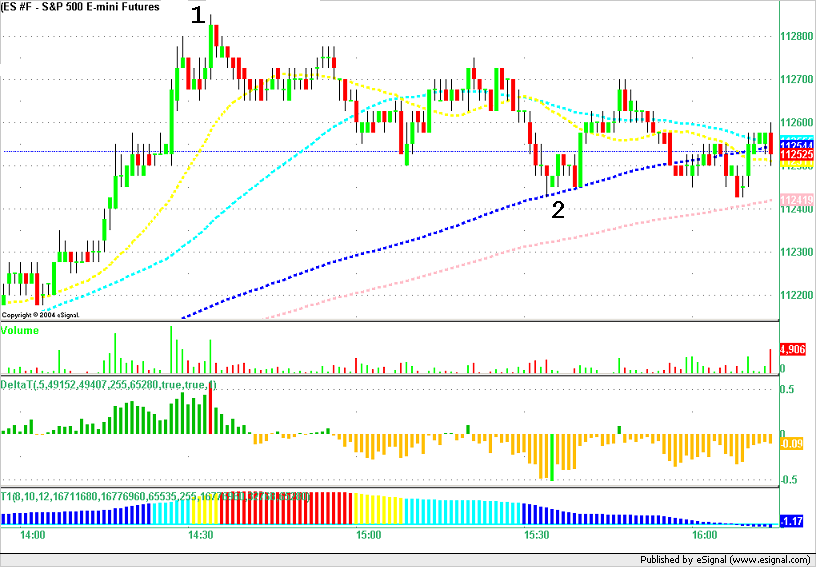
I use a stop of 1 to 2 points and usually in conjunction with a predefined point on the charts. Let's take a look at a 1 minute chart of the ES as an example. (The four lines on the chart are the 20, 144 and 200 SMAs. The thin dotted horizontal blue line is a floor pivot.)
At point 2 we have a DeltaT buy signal which coincides with the 144 SMA as support giving it a higher probability of success. The previous support line which has just been broken at point 2 was the floor pivot. With a long at point 2 would use a stop below the 200 SMA. So the long is around the 1124.50 area and the stop is 1123.00. Just like the 144 SMA provided support at point 2 I am expecting the 200 SMA to provide support if the 144 SMA doesn't hold. In this case the stop is never needed and I would have trailed my stop to breakeven after the first profit partial was taken.
If, on the other hand, I'd received a short signal at point 2 and say entered short at 1124.50 I would have used a stop at the floor pivot of 1125.75 or at the 20 SMA 1126.25 for a 1.25 to 1.75 point loss. In this case the trade would have suffered a loss of up to 1.75 points.
Targets
Before you enter a trade you should have a good idea in mind where your targets are. My personal trade management technique is to minimize risk. I don't want a winning trade to turn into a loser. As such I will take half of the position off at 1 point and then move the stop loss to break even and run the rest.
Using this technique and the example above and assuming that I went long at 1124.50 at point 2 I would have taken half the position off at 1125.50, a quarter off at 1126.50 and then the last quarter off somewhere between 1125.50 and 1126.50. (After I'd taken the first partial profit I would have moved the stop to breakeven.)
Using fixed targets of 1 and 2 points is not necessarily a good idea - in fact most of the time it's better not to use fixed targets as I've explained above but rather ask the market what can reasonably be achieved in this trade. Using this more realistic approach we put targets at the floor pivot and either the 20 or 50 SMA. Assuming a long at point 2 at a price of 1124.50 we take half our position off at 1125.25 and then a quarter off at 1126.25 and then the final quarter off at 1125.25 when the 50 SMA resistance turned support fails.
Trailing Stops
Once you've taken half your position off at (say) 1 point profit and trailed your stop to breakeven you know that the trade is going to end up profitable unless the market gaps through your stop. (As an aside: If you trade for long enough you will see the market gap through your stop and you will get a worse fill than the stop you've placed. Luckily this rarely happens but you should be aware of this particular and very real risk. It will happen one day and you should accept that fact now before it happens.) You may find it easier to assess market potential once you know that your trade is profitable and you will be able to work the most out of the contracts that you are still trading.
Once I've determined my absolute loss on a trade I trail a soft stop to breakeven and then use a hard stop from there onwards. My use of trailing stops falls into 2 categories depending on the market behavior:
If we're in a trending market and I've traded in the direction of the trend on a pullback then I will trail the stop further and slower because I'm trading with the trend. It is likely that I will trail the stop to a 0.50 point loss instead of breakeven once I've taken off the first partial in this case.
If we're in a sideways, choppy or tight range market then I will aggressively trail the stop and make sure that the trade turns out to be profitable. I will also do this if I've traded counter-trend in a trending market - for example on a multi-bar DeltaT signal.
Stop and Reverse (SAR)
An SAR is often used as a technique for gaining extra points in a trending market. DeltaT can signals a multi-bar buy/sell which is an opportunity to trade make more points counter-trend before re-joining the trend.
Technically an SAR is a stop order of a magnitude greater than your current position which gets you into a position in the opposite direction when executed. In our trading we use SAR as a specific strategy and may use it with a soft or hard stop or with a limit order. There are certain signals that we expect to fail. For example, a multi-bar DeltaT buy signal is a signal that we expect to give us a few points in a long position but ultimately we expect the low that's just been formed on that signal to be broken again and as such we trade the long side with the signal but we look for a place to SAR this trade back into the trend and to the short side. We might use a limit order at our target which is larger than our position (typically double the size of our position) to reverse the trade. This would correctly be called a Limit and Reverse or LAR but we don't use this and for simplicity we call it an SAR. If our limit is not filled in this case we might use a soft stop of double our position size to close and reverse the current trade.